
Epoxy countertops have surged in popularity, transforming kitchens and bathrooms with their glossy, seamless, and customizable surfaces. They offer a unique blend of durability, aesthetic appeal, and creative freedom, making them a compelling alternative to traditional materials like granite or quartz. This comprehensive guide will walk you through the entire process of creating your own epoxy countertops, from initial planning to final finishing, ensuring a professional-looking result.
Understanding the Allure of Epoxy Countertops:
Before we delve into the how-to, let’s understand why epoxy countertops are so coveted. Their primary advantage lies in their versatility. Epoxy can be tinted, pigmented, and embedded with various materials like glitter, metallic powders, stones, and even photographs, allowing for endless design possibilities. This adaptability makes them perfect for homeowners seeking a truly unique and personalized look. Furthermore, epoxy creates a non-porous, waterproof, and heat-resistant surface, making it ideal for kitchens and bathrooms where spills and moisture are common. Their durability is another significant selling point, as they resist scratches, stains, and impacts, ensuring a long-lasting investment.
Essential Materials and Tools for Your Epoxy Project:
Creating epoxy countertops requires a specific set of materials and tools. Gathering everything beforehand will streamline the process and prevent frustrating interruptions.
- Epoxy Resin: Choose a high-quality, food-safe epoxy specifically designed for countertops. These resins are formulated for durability and clarity.
- Hardener: This is the catalyst that activates the resin, causing it to cure. Ensure you use the correct hardener for your chosen epoxy.
- Pigments and Tints: Select pigments or tints compatible with your epoxy resin. These are available in a wide array of colors and finishes.
- Metallic Powders, Glitter, and Other Embedments: If you desire a unique design, gather your chosen embedments.
- Measuring Cups and Mixing Buckets: Use graduated measuring cups for accurate resin and hardener ratios and large mixing buckets for thorough blending.
- Mixing Sticks or Drill with Mixing Attachment: A drill with a mixing attachment ensures consistent and efficient mixing, minimizing air bubbles.
- Heat Gun or Torch: This helps eliminate air bubbles and create a smooth, glossy finish.
- Level: Ensuring a level surface is crucial for even epoxy distribution.
- Drop Cloths and Plastic Sheeting: Protect surrounding surfaces from spills and drips.
- Painter’s Tape: Use high-quality painter’s tape to create clean edges and prevent epoxy from seeping onto unwanted areas.
- Sanding Paper (Various Grits): For surface preparation and smoothing imperfections.
- Respirator and Gloves: Protect yourself from epoxy fumes and skin contact.
- Clean Rags and Sponges: For cleaning spills and smoothing edges.
- Sealant (Optional): Some epoxy countertops benefit from a topcoat sealant for added protection and shine.
Step-by-Step Guide to Creating Epoxy Countertops:
-
Surface Preparation is Paramount:
Proper surface preparation is the foundation of a successful epoxy countertop project. Ensure your existing countertop is clean, dry, and free from any loose debris. Sand the surface with medium-grit sandpaper to create a slightly rough texture, allowing the epoxy to adhere properly. Repair any cracks or imperfections with a suitable filler. Clean the surface thoroughly with a damp cloth and allow it to dry completely. Apply painter’s tape to the edges of the countertop to create a clean, crisp line and protect surrounding surfaces.
-
Mixing the Epoxy Resin:
Carefully measure the resin and hardener according to the manufacturer’s instructions. Incorrect ratios can result in a soft, tacky finish or a failure to cure. Pour the hardener into the resin and mix thoroughly for several minutes. Use a drill with a mixing attachment for optimal results. Ensure the mixture is homogenous and free from streaks. Add your chosen pigments or tints and mix until the color is evenly distributed. If you’re using embedments, incorporate them into the mixture or apply them to the surface after pouring the epoxy.
-
Pouring and Spreading the Epoxy:
Pour the mixed epoxy onto the prepared countertop, starting in the center and working your way outwards. Use a plastic spreader or squeegee to distribute the epoxy evenly across the surface. Ensure the epoxy covers the entire countertop and reaches all edges. For thicker pours, apply the epoxy in layers, allowing each layer to partially cure before adding the next. This prevents excessive heat buildup and ensures a stronger bond.
-
Eliminating Air Bubbles:
Air bubbles can mar the finish of your epoxy countertop. Use a heat gun or torch to gently pass over the surface, popping any bubbles that rise to the top. Keep the heat gun or torch moving to avoid scorching the epoxy. Repeat this process as needed until all bubbles are eliminated.
-
Curing and Finishing:
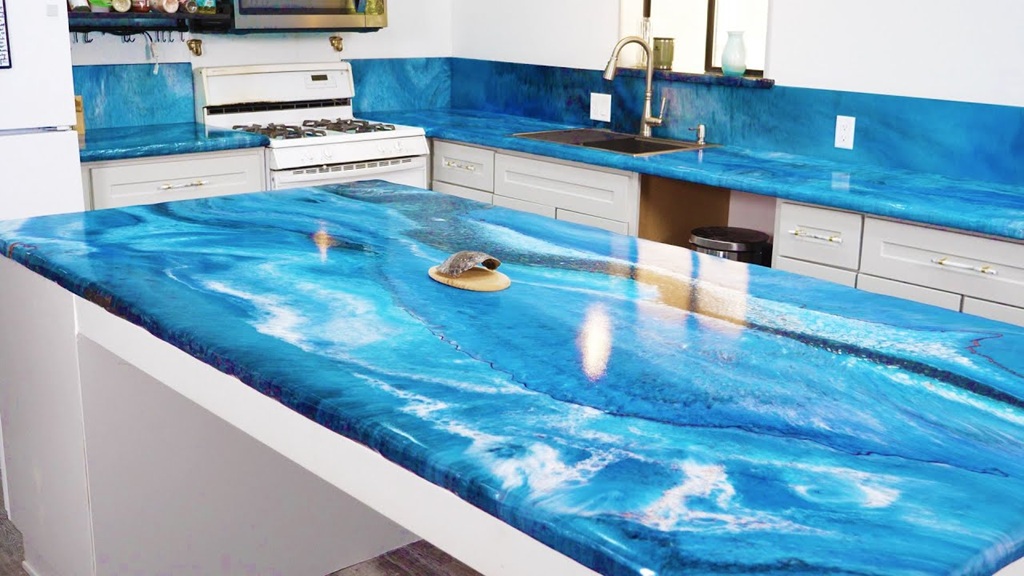
Allow the epoxy to cure according to the manufacturer’s instructions. This typically takes 24-72 hours, depending on the ambient temperature and humidity. Do not disturb the countertop during the curing process. Once the epoxy is fully cured, inspect the surface for any imperfections. Sand any rough spots or drips with a fine-grit sandpaper. Clean the surface with a damp cloth and apply a sealant (if desired) for added protection and shine.
Related: Organizational Hacks: Declutter Your Kitchen with Clever Cabinetry Features
-
Adding Embedments and Special Effects:
For those seeking unique designs, embedments like stones, glitter, or metallic flakes can be added. These can be sprinkled onto the wet epoxy or carefully placed after pouring. Metallic powders and pigments can be swirled or layered to create mesmerizing patterns. Experiment with different techniques to achieve your desired aesthetic.
-
Addressing Common Issues:
- Tacky Finish: This usually indicates an incorrect resin-to-hardener ratio or insufficient mixing.
- Air Bubbles: Use a heat gun or torch to eliminate them during the curing process.
- Uneven Surface: Ensure the countertop is level before pouring the epoxy.
- Cloudy Finish: This can be caused by moisture or improper mixing.
People Also Ask (FAQs):
Q: Are epoxy countertops food-safe?
A: Yes, when using a food-safe epoxy resin. Ensure the product is specifically designed for countertops and complies with relevant safety standards.
Q: How long do epoxy countertops last?
A: With proper care, epoxy countertops can last for many years. They are durable and resistant to scratches, stains, and impacts.
Related: 5 Different Types of Kitchen Cabinets You’ll Love
Q: Can I use epoxy over existing countertops?
A: Yes, epoxy can be applied over existing countertops, but proper surface preparation is crucial.
Q: How much does it cost to make epoxy countertops?
A: The cost varies depending on the size of the countertop, the type of epoxy resin used, and the complexity of the design. DIY epoxy countertops are generally more affordable than professional installations.
Q: Can I use any type of epoxy resin for countertops?
A: No, use a high-quality, food-safe epoxy resin specifically designed for countertops.
Q: How do I clean epoxy countertops?
A: Clean epoxy countertops with a mild soap and water solution. Avoid using harsh chemicals or abrasive cleaners.
Q: Can I repair scratches on epoxy countertops?
A: Yes, minor scratches can be repaired with a spot application of epoxy resin.
Q: Can epoxy countertops be used outdoors?
A: Some epoxy resins are formulated for outdoor use, but they may require a UV-resistant topcoat to prevent yellowing.
Q: How thick should epoxy countertops be?
A: The thickness depends on the desired look and durability. Typically, epoxy countertops are between 1/8 inch and 1/4 inch thick.
Q: What are some design ideas for epoxy countertops?
A: Epoxy countertops offer endless design possibilities, including marble effects, metallic finishes, and embedded objects.
By following this comprehensive guide, you can create stunning and durable epoxy countertops that enhance the beauty and functionality of your home. Remember to prioritize safety, take your time, and enjoy the creative process.